Tuesday, May 11, 2010

HUMMINGBIRD CUPCAKES

This is a Martha Stewart inspired recipe. My version is semi-homemade, which came out pretty good! ...really, really good!!

Ingredients for the cake:

1 box yellow cake mix
3 eggs
1 1/4 C water
1/3 C oil
1 ripe banana (cubed)
1 C crushed pineapple drained
1/2 C roasted sweetened coconut flakes
1/2 C roasted chopped pecans

1.Preheat oven to 350 degrees F. Line cupcake pan with paper liners; set aside.

2. Follow the cake mix box instructions to make the cake batter.

3. Add in the chopped banana, crushed pineapple, walnuts and coconut. Stir and mix until combined.

4. Divide batter evenly among liners, filling about 2/3 full. Bake until golden brown and a cake tester inserted in the center comes out clean, about 25 to 30 minutes.

5. Transfer to a wire rack to cool completely. Once cupcakes have cooled, top each cupcakes with the cream cheese frosting. Decorate with dried pineapple flowers. Serve at room temperature.


CREAM CHEESE FROSTING
Ingredients for the frosting:

1 8 oz cream cheese (room temperature)
1 stick unsalted butter (room temperature)
1 lb powdered sugar
1 teaspoon vanilla extract

Makes 3 cups

Directions

1. Beat cream cheese and vanilla until light and creamy, about 2 minutes. With mixer on medium speed, gradually add butter, beating until incorporated.

2. Reduce mixer speed to low. Slowly add sugar, beating until incorporated. Use immediately, or cover and refrigerate up to 3 days. Bring to room temperature before using.

PINEAPPLE BLOOMS/FLOWERS

Makes about 3 dozens depending on the size of your pineapple.

Ingredients for pineapple blooms/flowers:

1 Fresh ripe pineapple peeled.

Directions:
1. Preheat oven to 250 degrees F. Line two baking sheets with nonstick baking mats or parchment paper.

2. Using a small melon baller, remove pineapple "eyes." Using a sharp knife, cut pineapple crosswise into very thin slices. Transfer slices to baking sheets. Bake until tops look dried, about 30 minutes. Flip slices; bake until completely dried, 25 to 30 minutes more. Let cool in a small muffin pans to form flowers. Refrigerate in an airtight container up to 3 days.





Thursday, May 6, 2010

CREAMY PORK ENCHILADAS


I call this dish "Fusion Enchiladas", my go to recipe especially if i crave for one and just don't have the time to prepare the authentic Mexican enchiladas.  This recipe is easy to make and majority of the ingredients are pantry staple.

Ingredients:

2-1/2 cups chopped pan seared or grilled pork or chicken.

1 can (10-3/4 oz.) condensed cream of chicken soup

1 pkg. (8 oz.) Shredded Colby & Monterey Jack Cheese, divided

1 cup Sour Cream, divided

1/4 cup chopped cilantro, divided

12 flour tortillas (8 inch)

2 1/2 cups Picante Salsa

HEAT oven to 350°F.

MIX pork or chicken, soup, 1 cup cheese, 1/2 cup sour cream, 1/2 cup salsa and 3 Tbsp. cilantro until well blended. Spoon down centers of tortillas, adding about 1/4 cup to each; roll up.

PLACE, seam-sides down, in 13x9-inch baking dish sprayed with cooking spray; top with salsa and remaining cheese.

BAKE 25 min. or until heated through. Top with remaining sour cream and cilantro.


Tuesday, May 4, 2010

COCHITO CHIAPANECO (CHILE – SEASONED POT ROASTED PORK )

I have been in a Mexican state of mind not only because of Cinco de Mayo, but also because of a dish that I've been interested to try and what a great excuse to make it, Cinco de Mayo is right around the corner. I also intend to use some of the pot roast for another Mexican dish which  I will be blogging soon.

This recipe is from Rick Bayless Mexican Kitchen Cookbook. I've been planning on making carnitas, carne asado or anything with braising, slow cooking.  This dish is what i've been looking for, simple, easy yet has a complex flavor. Roasting the chiles were not necessary, according to Rick Bayless, for this type of long cooking dish, you will not be able to distinguish the taste of roasted or not roasted peppers  which was surprisingly true. Don't be deceived or be overwhelmed with the process, it is easy, promise.

The dried and herb ingredients are easy to find, they are all in the Mexican aisle in your grocery store. I used  a 5 lb. pork shoulder picnic w/ skin on.

Note: Pls. wear gloves as you handle the dried chiles. I should have known better! I had my gloves ready, i knew the consequence if you'll not wear one..but..of course i got so excited i forgot to wear my gloves and went ahead rubbed the side of my eye..ouch!! that was one my DUH moment!

You will have to add patience to the ingredients because you'll definitely be on a waiting game and oh ..add torture game. The recipe says at least 2-3 hours for a picnic ham, i cooked mine for 4 1/2 hours. Torture game? yes!! oh the aroma, it was all over the house and made me so hungry, but it was well worth it. Okay..without further a do, here's the recipe and some pictures.

Y: 6 servings (enough meat for 20 good size tacos)

Ingredients:

2 medium ( about 1 0z.) dried ancho chiles, stemmed and seeded

4 medium (about 1 0z.) dried guajillo chiles, stemmed and seeded

2 bay leaves

2 tablespoons cider vinegar ( 4 T OF CIDER VINEGAR- 2 T  WOULDN'T SUFFICE)

1/2 small white onion, peeled and roughly chopped, plus a few slices for garnish.

2 cloves garlic, peeled and roughly chopped

1 teaspoon mixed dried herbs such as marjoram, thyme, and Mexican oregano

1/4 teaspoon allspice, fresh ground

1 pinch ground cloves

1 ½ tablespoon lard or oil

1/2 teaspoon salt (1 TABLESPOON SALT)

3 lbs. pork shoulder, boneless or Boston butt roast or 4 ½ lbs. fresh picnic ham with skin (for classic crispy skin)

8 romaine leaves, for garnish

3 radishes thinly slices, for garnish

water

Directions


Chile paste:
Place the chiles in a small bowl, cover with hot water and let stand for 30 minutes to rehydrate, stirring occasionally to ensure even soaking. Drain, reserving 2/3 C liquid, then transfer the chiles and reserved liquid to a food processor.  (I SAVED ALL THE LIQUID FOR LATER USE.)


Pulverize the bay leaves in a spice grinder or mortar, then add to the blender along with the vinegar, onion, garlic, mixed herbs, allspice, and cloves. Process to a smooth puree (adding a little more water if needed to keep the mixture moving through the blades); press through a medium-mesh strainer into a small bowl. (USED THE SOAKED LIQUID.) (I SKIPPED THE STRAINING STEP)


Set a large 6 quarts pot with lids (Dutch oven) over medium-high heat and add the lard or oil. When hot enough to make a drop of the puree really sizzle, add it all at once. Stir constantly as the puree sears, concentrates and darkens into a spicy smelling paste, about 5 minutes. Remove from the heat and season with salt.


Seasoning and pot-roasting the meat:
Turn on the oven to 325 degrees F. If you are using pork shoulder or butt, cut into slabs roughly 3 inches thick. Leave a picnic ham whole but make 1 inch deep incisions every few inches all over the meat. Lay the meat in the pot with the chile paste, then flip it over to cover with the chile (slathering with a spoon or spatula to give an even coating.) Pour ½ C water around the meat, cover tightly, and place in the oven. (AGAIN I USED THE SOAKED WATER)


Baste the meat every 30 minutes with the liquid (SOAKED LIQUID) and rendered fat that accumulates around it. After about 2 ½ hours ( fresh ham may need about ½ hour to 1 hour) (4 1/2 HOUR TOTAL) the meat will be fork-tender and will have darkened to an appetizing and crusty rich, red-brown. If all the liquid evaporated during the cooking, leaving only chile-paste and fat, dribble a little more water into the pan so you can go on basting. If time allows, let the pork stand, covered, for 20 - 30 minutes to reabsorb the juices before serving. ( I TOOK OFF THE LID AND  BROIL THE MEAT FOR 10-15 MINUTES TO MAKE THE SKIN CRISPY)


Serving the meat: Line a serving platter with the lettuce leaves. Transfer the meat to the platter, then taste the pan juices and add a little more salt if necessary. Spoon the juices over the meat, then scatter the onion slices, and radish slices over all.


The recipe didn't suggest serving this w/ tortilla but i did, along w/ some of the chili paste.


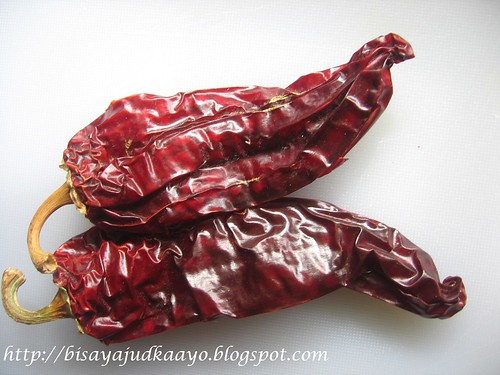
GUAJILLO CHILE


ANCHO CHILE


Chile Paste! This is really good, i can definitely use this with other dishes. I opted not to strain the paste, i don't think it is necessary. I want it to stay rustic, but if the seeds and other particles bother you go ahead and strain the paste.


Notice the shiny part? that's the crispy skin.

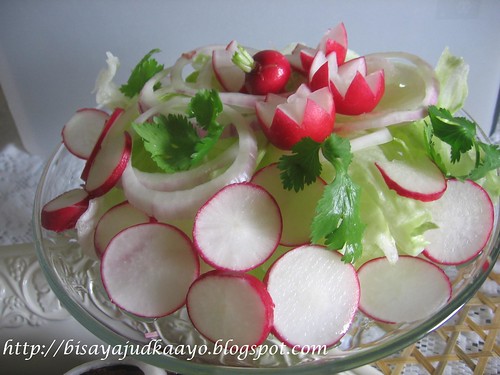
This salad added another layer of flavor to the dish. Good stuff!


Rick Bayless didn't suggest the tortilla, but i think it's a must to the dish.


Monday, May 3, 2010

SMOKED SALMON QUESADILLA

A quick and easy tasty quesadilla. It's my 30 minute meal even less.

Ingredients:

Tortilla
Mexican cheese (shredded)
Smoked Salmon
Chipotle sauce
Cilantro
Sour Cream

Do the basic quesadilla assembly. Spread a handful of Mexican cheese around the flour tortilla.

Add what ever ingredients you would like to use. In this quesadilla i used smoked salmon, then i added chipotle sauce, cilantro.

Top with another piece of flour tortilla.

Heat your pan and add a tablespoon of butter mixed w/ a little of canola oil.

When the butter is melted, carefully put the quesadilla into the pan. Cook until brown and the cheese is melted. Turn the quesadilla over and cook until done.

Cut into four slices.

Serve with Lime slices and Sour Cream.


Monday, April 26, 2010

PAN DE COCO

This is my April Bread Challenge. I have always wanted to learn how to bake one of my favorite Filipino bread Pan de Coco. I was planning on using the dough for my walnut rolls but i figured i should go authentic, i know that sour cream is definitely not one of the ingredients in making pan de coco.

I also thought of making my pan de sal dough but then that'll defeat my bread challenge ( to make different kinds of yeast based bread at least once a month). I finally found this rolls recipe from Red Star Original, BROWN AND SERVE PAN ROLLS with some tweakings.

These rolls turned out good but not exactly the kind of dough i remembered used for the Pan de Coco. So..i'm still on a quest to find that perfect dough, soft, pillowy pan de coco dough but this recipe would suffice for now.

Y: 24 rolls

FILLING:

2 C brown sugar
2 C sweetened coconut flakes

Mix both ingredients and set aside.

BREAD DOUGH:

1 1/3  C  Water
1/4  C  Oil
5 C  Bread Flour
1 t Salt
2 T  Sugar
4 1/2  t Active dry yeast ( 2 packs of 1/4 oz active dry yeast)

NOTE: MILK MAY BE USED IN LIEU OF WATER FOR A SOFTER CRUMB AND CRUST ROLLS.

MIXER METHOD

In a large mixing bowl, combine 2 + 1/2 C flour, yeast, sugar, and salt; mix well.

Combine water and oil; heat to 120 degrees F.

Add to flour mixture. Blend at low speed until moistened; beat 3 minutes at medium speed.

By hand, gradually stir in enough remaining flour to make a soft dough.

Knead on floured surface until smooth and elastic, 5 to 8 minutes.

RISING, SHAPING AND BAKING

Place in greased bowl, turning to grease top.  Cover; let rise until dough tests rise

Punch down dough and knead on a floured board for 5 minutes.

Divide dough and roll each half into a 12×2 inch log.

Cut each into 12 pieces to yield 24 rolls.

Roll each piece into a ball using your hands then rolling it flat into a 3 inch diameter circle.

Place a little of soften butter and a heaping tablespoon of the coconut sugar filling.

Gather sides of round, pinch together and twist.

Place pinched side down on parchment paper, repeat until done.

Cover; let rise in warm place for an hour or until indentation remains after touching.

Bake rolls in a 350 degrees F oven for 25 minutes or until brown.

Let set 30 minutes in pans.  Turn out of pans; cool on a wire rack to room temperature.


Sunday, April 25, 2010

CHEESE PIMIENTO FILIPINO STYLE

Ingredients:

2 C Queso de bola or Cheddar Cheese- grated
1 C Mayonnaise***
½ C Pimiento (chopped finely if you don’t want to use a food processor)
¼ C Condensed Milk

THE MEASUREMENTS FOR THE INGREDIENTS ARE ROUGH ESTIMATES.
*** Start with 1 C of mayo, add more if you think the mayonnaise is not enough.

This is one of my “no recipe” recipe. You will have to taste and be the judge on how salty, sweet and creamy you want your cheese pimiento. Put them all in the food processor, pulse until they are all incorporated.


Wednesday, April 21, 2010

CHICKEN LETTUCE WRAP A LA P.F. CHANGS (MY VERSION)

This dish is one of my all time favorite. My potluck dish. I love the amalgamation of the flavors, texture the minute you bite into the cool crisp crunchy lettuce. Yum..., oh so refreshing.

I have tried this with pork, turkey and chicken, they were all delicious, i love them all.

I know some will find this recipe overwhelming because of the ingredients, but really, chances are they are in your pantry and refrigerator.

Ingredients:


1/4 cup minced black fungus (available at Oriental stores) or use other mushrooms
1 teaspoon cornstarch
2 teaspoon dry sherry
2 teaspoon water
salt and pepper to taste
1 pound boneles skinless turkey or chicken and pork minced*
5 tablespoon oil
1 teaspoon fresh minced ginger
2 cloves garlic, minced
2 stalks green onions, minced
1 teaspoon dried chili flakes (optional)
1/4 cup bamboo shoots, minced
1/2 package of Chinese rice noodles

COOKING SAUCE:

1 tablespoon hoisin sauce
1 tablespoon soy sauce
1 tablespoon dry sherry
2 tablespoons oyster sauce
2 tablespoon water
1 teaspoon sesame oil
1 teaspoon sugar
2 teaspoon cornstarch
Lettuce of your choice to make lettuce cups (i used iceberg lettuce/lettuce head)

PROCEDURE:

Soak dried black fungus/mushroom with warm water for 30 minutes or until tender then drain and mince.

Mix all ingredients for cooking sauce in a bowl, and set aside.

In a medium bowl, combine cornstarch, sherry, water, soy sauce, salt, pepper and turkey.

Stir to coat turkey thoroughly.

Stir in 1 teaspoon oil and let sit 15 minutes to marinate.

Heat a large skillet over medium high heat.

Add 3 tablespoons of oil, then add the turkey and stir fry for about 3-4 munutes or until it changes to white color

Add another 2 tablespoon oil, then add ginger, garlic, chili flakes and onions.

Stir fry about a minute or so.

Add mushrooms, bamboo shoots and stiry fry for another 3 minutes.

Add the mixed cooking sauce to the pan.

Cook until thickened and hot. Transfer into a bowl and set aside.

In the meantime, using a frying pan with hot oil, fry the rice noodles by batch, until they float and turns puffy. Break the cooked rice noodles into small pieces.

Arrange some noodles in a lettuce cup and spoon turkey mixture on top of noodles and roll. Enjoy!!

**I prefer minced over groundmeat for the texture and moisture.


Frying the noodles could be tricky. Cook them too early w/ not so hot oil you'll end up w/ the bottom fried noodles w/c is not edible. Oil should not be very very hot. Prepare your screen strainer to put your cooked noodles to drain right beside your pot.
The noodles on top is the perfect puffed crispy noodles.


CRISPY KANGKONG

This is another dish that i love using KANGKONG . "ANG KANGKONG BOW" Okay, that was funny and corny! Just wanted to do that, brings back childhood memories.

Ingredients:

2 bunches of kangkong leaves, cleaned*
½ c corn starch
1 c tapioca flour – you can use All Purpose flour for substitute
1 c water
pinch of S&P
pinch of paprika
Canola oil for frying

1. Clean kangkong thoroughly.
2. Remove leaves from stem, set aside.
3. Combine cornstarch, tapioca flour, water and the seasonings. Mix until smooth/pancake batter consistency. Taste and adjust, re-season if needed.
4. Heat oil to at least 250 degrees F on medium high.
5. Dip kangkong leaves one at a time in batter and fry until crispy.

BEST SERVED W/ A SPECIAL DIP

½ c Mayonnaise
½ C Banana Ketchup – Use regular ketchup for substitute
1 clove garlic – minced
S&P to taste

Mix all ingredients. Taste and adjust.

* Soak kangkong leaves in a bowl of tap water and 1 T salt for few minutes. This water mixture will extract whatever bugs are in every nooks and crannies.


Tuesday, April 20, 2010

ADOBONG KANGKONG

" In the Philippines, KANGKONG- Ipomoea aquatica is usually sauteed in cooking oil, onions, garlic, vinegar, and soy sauce. This dish is called "adobong kangkong". It is also a common leaf vegetable in fish and meat stews like sinigang. There is also an appetizer in the Philippines called "crispy kangkong", in which Ipomoea aquatica leaves are coated with batter and fried until crisp and golden brown." http://en.wikipedia.org/wiki/Ipomoea_aquatica

There are 2 types of kangkong. one with longer thinner leaves and the wider with a heartshape leaves which i prefer. But i think there is no distinct flavor/difference between the two variety.


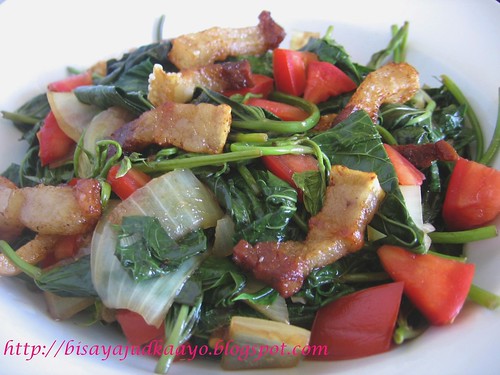
Adobong Kangkong


Y: 4 servings

2 bunches of kangkong

¼ lb of porkbelly, diced

3 cloves garlic, minced

1 small onion chopped

2 roma tomatoes - diced

3 T soy sauce

3 T vinegar- I suggest Datu Puti (Filipino Vinegar)

S&P to taste

Pepper flakes (optional)


1. Wash and clean kangkong.***

2. Separate leaves and cut stems into 1 inch lengths.

3. Render the diced pork belly until brown and crispy.

4. Set the pork and oil aside.

5. Using the same pan or wok with a little of the pork fat, sauté the garlic and onions until they turn translucent.

6. Add the kangkong stems and tomatoes, cook until the thicker stems are tender.

7. Add in the kangkong leaves, vinegar, soy sauce, a pinch of S&P and the crispy porkbelly.

8. Cover and bring to a simmer or until liquid has reduced.

9. Serve with fried fish and steamed rice.


* Soak kangkong in a bowl of tap water and 1 T salt for few minutes. This water mixture will extract whatever bugs are in every nooks and crannies.


 Best served w/ fried fish and steamed rice.

Tuesday, April 13, 2010

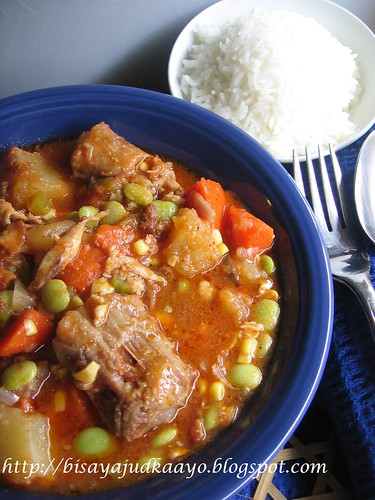
BRUNSWICK STEW- APRIL DC CHALLENGE

Once again, i thought i will have to pass this month's challenge. I was just too busy and found a short time frame to go ahead and do the challenge since i had all the ingredients all ready.

This was a photo finish, i literally made this today, revelation day and it was worth it. Thank you, Wolf's Den for this wonderful challenge. 

Pls. check the RECIPE HERE . I did Recipe One- the longer version, but divided the quantity since the original recipe is just too much for us.

I used the combination of ox tail and chicken, the dark meat and the wings to be specific, because i wanted more flavor. I also left the ox tail as is, because i love to gnaw on those little boney "tails". I used all the vegetables required, i even bought some okra, in addition but totally forgot about it! It was already good sans the okra, anyways.  This was really good and will definitely make this again!

 
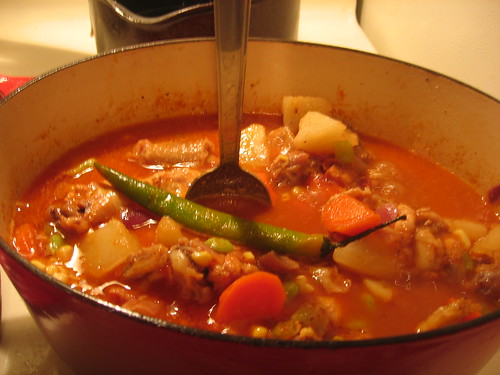
The obligatory spoon test! I don't know about you guys, but i had to gather the ingredients to the middle so it'll support my spoon=;).


Served the stew with steamed Jasmine rice.