Showing posts with label Sweet treats. Show all posts

Thursday, July 5, 2012

BANANA PEANUT BUTTER ICE CREAM MADE EASY

 Another Pinterest must try "goodness". Check Here for the original recipe .
Was so impressed with the end result. I can't believe an ice cream was made sans cooking or the ice cream maker and with only 2 ingredients. You can actually make the ice cream with just the banana but i opted to add peanut butter. Others add cocoa powder for variety.

You must give this a try!!!


 Banana Peanut Butter Ice Cream


Slice your very ripe bananas before putting them in the freezer. Pre-slicing them will make it easy to blend in your processor and saves you time.


Pulse until it will turn into a gravel like texture. Then gently mix them towards the middle so everything gets incorporated. I added 2 Tablespoon of peanut butter at this stage (gravel stage). Pulse and blend.


Pulse and blend until you get a soft serve ice cream texture.


Viola! Banana Peanut butter Ice cream!!!


Tuesday, November 29, 2011

Ekmek Kataifi (A Greek Dessert)

I have a long list of favorite desserts and this is one of them. I finally found a good recipe in English. I'm sure there are a lot of good recipes but just not in English.  Got this recipe from Kali Orexi .

Ekmek, Ekmek Kadayifi, Ekmek Kataifi (pronunciation - silent K  (ek-meh) silent i (kah-da-if) however it's called all i can say...they are "to die for"
If you like custard, phyllo and whipped cream then you are in for a treat....A MUST TRY DESSERT. ;)

 If you can't find the shredded phyllo  you can  Make your own Kadaif . 

** I'm so happy w/ the end result.
**Next time, i will bake my kataifi a little bit longer to get the brown color which i'm sure will give another layer of flavor.
**I will add more almonds but make sure to add them after slicing to get a perfect and beautiful slice of your ekmek.


Brush the Kataifi strands with the melted butter then place the pan in the oven. 


Toast the Kataifi strands until golden brown.


For the pastry base:

1lb. Kataifi pastry
1/2 cup melted unsalted butter, plus a pat more for buttering the pan

For the Syrup:
1 cup sugar
1/2 cup water
1 tsp. fresh lemon juice

For the Custard:
7 egg yolks
6 cups milk
1 1/2 cups sugar
7 tablespoons fine semolina
4 tablespoons corn starch
1 teaspoon vanilla
2 Mastiha crystals, ground with a mortar and pestle (Skipped this step)


Preheat oven to 375 degrees. Butter a large rectangular baking pan (about 11×15 inches), making sure it is relatively deep enough to accommodate the layers of pastry, custard and whipped cream. To begin making the base, take the strands of Kataifi and pull them apart slightly while layering them in the bottom of the buttered pan–no need to press down on the Kataifi strands as they are better left light and fluffy. Brush the Kataifi strands with the melted butter then place the pan in the oven. Toast the Kataifi strands until golden brown.

Meanwhile, begin making the syrup by boiling the sugar with the water in a small saucepan for about 5 minutes. Remove from the heat and stir in the lemon juice, then pour the hot syrup over the toasted pastry base.

To make the mastiha-flavored custard, add the sugar and the egg yolks in a medium saucepan and whisk until combined. Alternating as you go, slowly begin adding the semolina, milk and corn starch whisking until well incorporated. Move the saucepan to a burner and set it over medium heat. Cook the mixture stirring constantly and being careful not to scorch it. Once the custard thickens, remove the saucepan from the heat and beat in the vanilla and ground mastiha. Cool slightly, then pour the custard over the Kataifi base. Let it all cool completely before adding the fresh whipped cream topping. (At this point you can cover the dessert and refrigerate overnight if you prefer, simply adding the whipped cream the next day just before serving.)

Just before serving, combine 2 cups heavy cream and 2 or 3 tablespoons sugar in the bowl of a standmixer (using the whisk attachment) and beat the cream to stiff peaks. Spoon the whipped cream over the custard layer and carefully spread it to each corner of the pan. Carefully cut the Ekmek Kataifi into square servings. Top with a pistachio spoonsweet or, more traditionally, with toasted almond slivers or chopped pistachios.
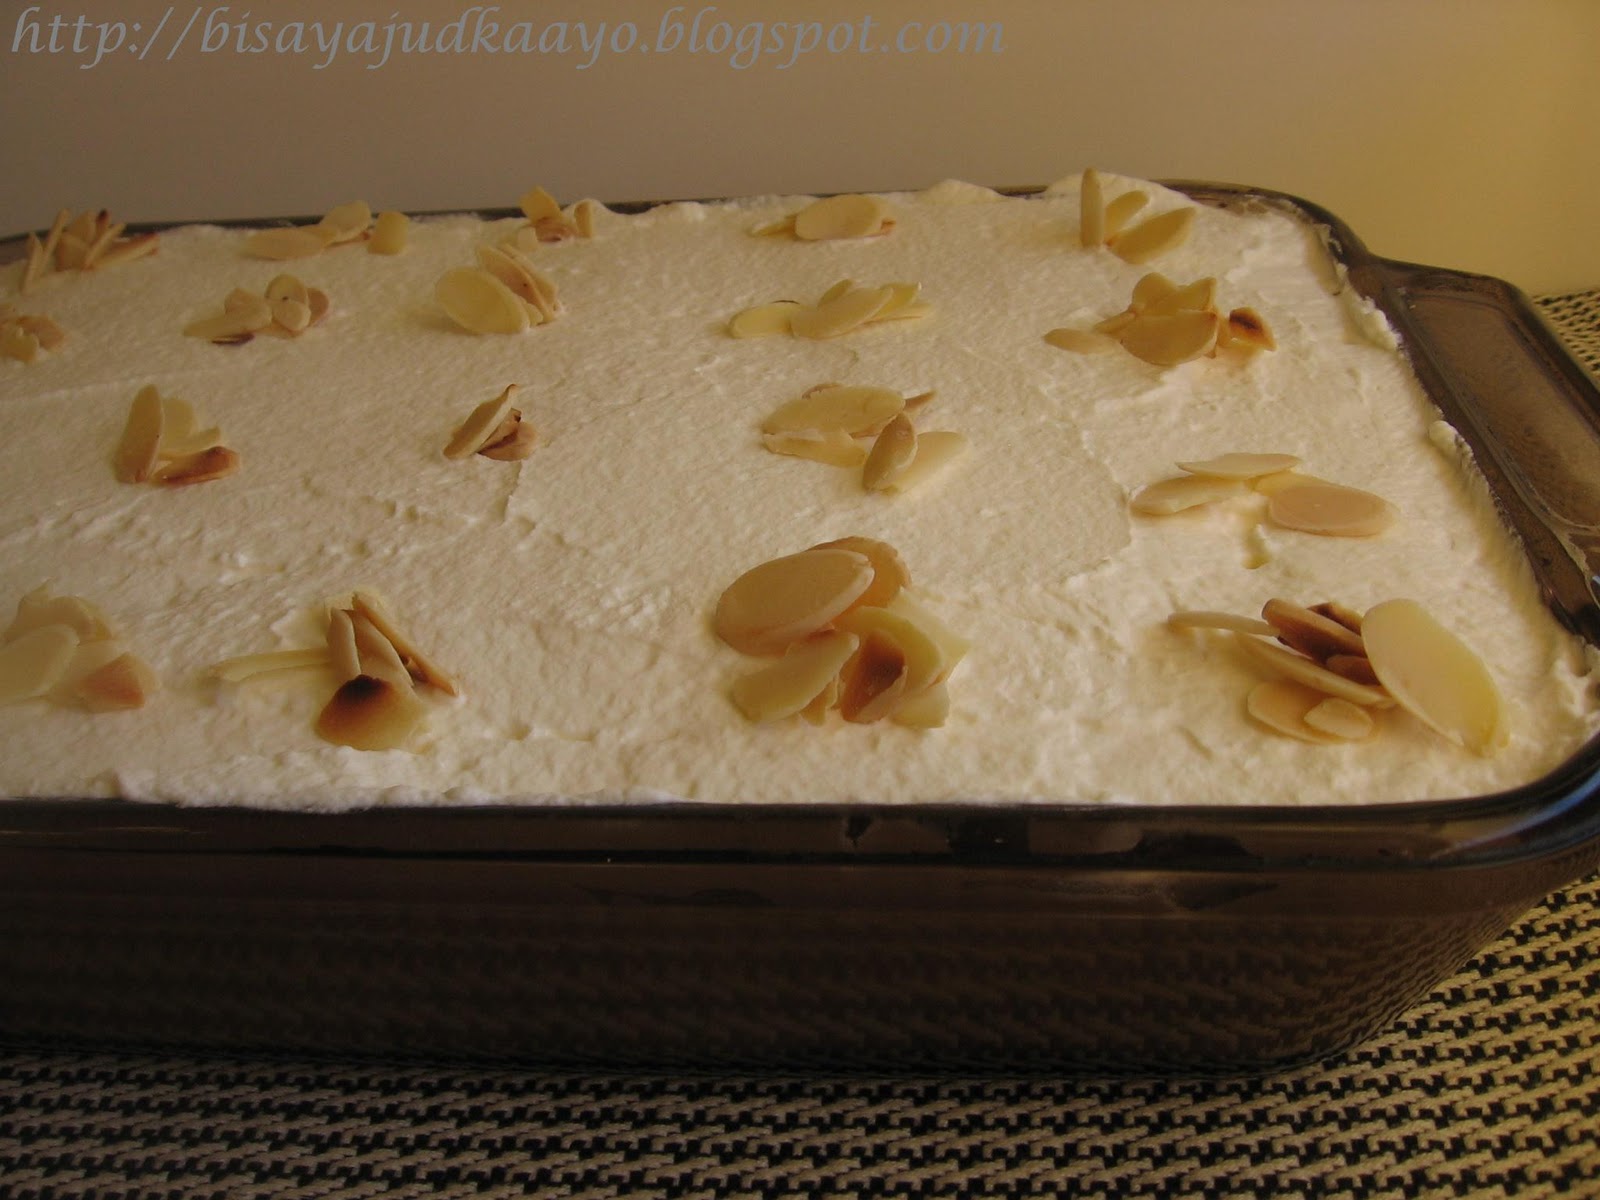
TOP WITH ROASTED SLIVERED ALMONDS


Custard w/ semolina flour and cornstarch (YUM)


Let this cool before adding the whipped cream.

It's way better if you whip your own cream.


Let this cool for perfect slices...i'm all about presentation...presentation ;). Arrange the slivered almonds strategically in that way you'll not ruin your slices. Add more after slicing.


Top view!!!


Friday, November 18, 2011

APPLE PIE COOKIES

Another great cookie recipe from my good friend Marina. I actually wasn't surprised that these cookies would come out delicious. Marina is a cookbook author, Taste of Home Field editor and Blue Ribbon winner, of course they are ooohhh sooo good ..okay, addicting ha!ha!
Thank you, Marina for another winner recipe.


These cookies are crunchy on the outside and moist and chewy in the inside, my kind of cookie  I'm not a fan of those crisp, hard cookies. Each bite you get to taste layers of flavor. you get the nutmeg, cinnamon sugar flavor right away then you get to taste the apple, then the nuts and the hint of the lemon orange extract. These are perfect for the holidays.


Ingredients::
Yield : 4 dozens.

3 eggs
1 lb sweet butter, softened
1 lb brown sugar
1 1/2 C sugar
1 Tbsp. cinnamon
1 1/2 tsp.  fresh grated nutmeg
2 Tbsp vanilla extract
1 Tsp. fiori di sicilia extract***
6 C sifted flour
1 1/2 tsp salt
1 1/2 tsp baking soda
2 C chopped walnuts, toasted ****
2-3 Tbsp. butter
3 C finely chopped apples (5-6 small apples)
2-3 Tbsp sugar
2-3 Tsp cinnamon

1 tsp fresh grated nutmeg
2 tsp fresh lemon zest
1 Tbsp fresh lemon

Cinnamon-Sugar


Preheat oven to 350 degrees F. Prepare cookie sheets with parchment paper, set aside.In a large bowl beat eggs 4 to 5 minutes. Set aside.Cream butter until creamy.
Add brown sugar and mix until well incorporated.
Add spices and extracts. 
Mix thoroughly to combine well.

Add beaten eggs to sugar-butter mixture and mix until well incorporated.
In a separate bowl, combine flour, slat and baking soda.
Add to batter and mix well, 
In medium to large saute' pan, melt the 2-3 Tbsp of butter.
In a medium bowl, toss chopped apples with sugar, cinnamon, nutmeg and lemon zest.
Saute' apples in melted butter until soft.
Add lemon juice and stir well.
Remove apples onto a flat plate to cool down.
Add cooled apples and walnuts to batter and mix until well incorporated.
Careful not to break apart the apples.
Refrigerate batter for 10 minutes.
Drop cookie batter by using an ice cream scoop onto prepared pans.
Sprinkle tops of batter with 1 tsp cinnamon sugar.
Bake only six cookies at a time on each cookie sheet.
Bake 18 to 20 minutes.
Let cool 5 minutes before removing from pan and placing them on a cooling rack.


**I didn't have fiori di sicilia extract. According to Marina you can purchase this from The Bakers Catalog of King Arthur's Flour. But you can make your own:

FIORI DI SICILIA EXTRACT (MIX YOUR OWN) : Lemon extract, Orange extract and Vanilla extract.

** I used mixed nuts. I used almonds, walnuts, hazelnuts.


Thursday, October 20, 2011

APPLESAUCE CUPCAKE WITH BUTTERSCOTCH CREAM CHEESE FROSTING

Made these cupcakes for a co-workers' birthday. I know some of  my foodie friends will not like the idea of using a cake mix. I don't really mind making cakes out of the box, end products are actually good. Now for the frosting, i want mine from scratch,  taste a whole lot better. Hey...that's my opinion ;)

This recipe is a combination of my previous cupcake recipe with some substitutions. In lieu of oil i used applesauce, which is not a secret, applesauce can be used to substitute the liquid for your cake batter. For the frosting i used the same recipe w/ the addition of the butterscotch ganache.. Viola a successful cupcake....and. is another keeper for sure!!! love the combination!


CUPCAKE BATTER
Ingredients:
1 package yellow cake mix
16 ounces applesauce
3 eggs

Preheat oven to 350 degrees F.
Using an electric mix, beat eggs, mix in cake mix, stir in apple sauce. Mix the batter well.
Scoop the batter into the cupcake liners, filling each liners about 2/3 full.
Bake cupcakes for 25 to 30 minutes or insert a toothpick through the center of the cupcake. If toothpick comes out clean, the cupcakes are done.
Let them cool on cookie racks.

BUTTERSCOTCH GANACHE
Ingredients:
1 package (11 oz) butterscotch chips
1 pint heavy cream

In a small pan, bring heavy cream just to a boil. Mix in butterscotch chips, whisk until smooth.
Let it cool or until thickened.

BUTTERSCOTCH CREAM CHEESE FROSTING
Ingredients:
1/4 C butterscotch ganache (you can add more if needed)
1 stick butter (softened)
1 package (8 oz ) cream cheese (softened)
3 cups powdered sugar (add one more cup if needed)

Beat butter, ganache, cream cheese in a mixer until well blended.
Add sugar gradually, beating after each addition until mixed and incorporated.
**add more powdered sugar if frosting is a bit runny.
**add a teaspoon of milk if frosting is to stiff.

ASSEMBLE THE CUPCAKE:
1. Spread a little of the ganache on top of the cupcake, just enough that it'll not drip on the sides.
2. Put frosting in a star tipped decorators bag.
3. Start piping from the outer edge working inward.


Wednesday, August 31, 2011

Peanut Butter Chili Fudge Mallows (Fudgey Mish- Mosh)

I know there are similar recipes out there, but this fudge was totally made just so i can save some items that were expiring that's why i originally called it "Kitchen Sink Fudge". But i have to change the name because Kitchen Sink Fudge doesn't sound appetizing right? Erin suggested Fudgey Mish- Mosh which i like ;) but then, i would like the readers to at least get an idea what kind of a fudge these are, so i opted to call it Peanut Butter Chili Fudge Mallows a.k.a Fudgey Mish Mosh.. Thank you Erin ;)

Wow!!!! these were really good.  It was actually a toss between cupcakes and fudge but opted for the later all because it was easier to make! ha!ha! No regrets though!

I  love the flavor profile. You get a hint of chili, a  hint of a bitter sweet from the chocolate. You can taste the salt flavor, the crunch  from the almonds and of course the peanut butter flavor. Then  the sweetness from the marshmallow and a hint of sour and creaminess from the cream cheese. Oh yeah!!! This is a keeper for sure!
Who would have "thunk it" a successful recipe was made out of saving expiring ingredients rather than throwing them away;)


1  8 oz. cream cheese (Philadelphia)
1 small bag of mini marshmallows ( I used GFS brand)
1 pack of 12 oz semi sweet chocolate chips (Nestle)
2 bars of Moser Roth chili chocolate
1 cup peanut butter
1 cup chopped  roasted and salted almonds

1. Melt chocolate with peanut butter and cream cheese in a sauce pan over low heat. Stir until mixed and smooth.

2. Fold in the marshmallow and almonds.

3. Pour into parchment lined baking pan and chill until firm.

4. Cut into ½ inch cube. Cutting it bigger will be too sweet.


Thursday, June 2, 2011

GINATAANG BILO- BILO /PINALTOK (GLUTINOUS RICE BALLS WITH COCONUT MILK)- MAY KULINARYA THEME

Better late than never;) Sefie and Connie chose Flores de Mayo for the Kulinarya Cooking Club theme for May. Flores de Mayo (Flowers of May) is one of so many events i look forward to. Pls. click http://en.wikipedia.org/wiki/Flores_de_Mayo for a better idea on what this means.

To me, May also means a collage of colors. Not only because of the beautiful flowers, the Procession in honor of  The Virgin Mary,  but because of  the fiesta celebrations, Santa Cruzan and the food!

This is why i opted for Bilo-Bilo because of the colors and a popular snack served during fiestas;) 

Ingredients:
1 pack glutinous rice flour
½ cup water (for the dough) and more if necessary
1 cup water to be mixed with the coconut milk
2 cups sugar
2 cans coconut milk
1 cup tapioca pearls
1 can jackfruit (langka), cut into strips

1. 
 
Mix glutinous rice flour and water into dough. Add more water if needed. Shape into balls depending on what size you want your bilo bilo to be. I prefer a size of an olive. These will expand as they get cooked. I use only half of what was made and freeze the rest of the dough for future use.* (I'D LIKE TO MAKE THEM ALL AT ONCE TO SAVE SOME TIME FOR NEXT BILO BILO)

 2. In a large pot, bring 1 can coconut milk, 1 cup water, 2 cups sugar, and tapioca pearls to a boil. Tapioca pearls are cooked when they turn transparent in color, and  rice balls.are soft and chewy.


3. Add remaining coconut milk and jackfruit when tapioca pearls and rice balls are cooked. At this point taste and adjust the sugar. Boil for 5 more minutes.

4. Serve hot.


Make dough balls, a size of an olive.


.


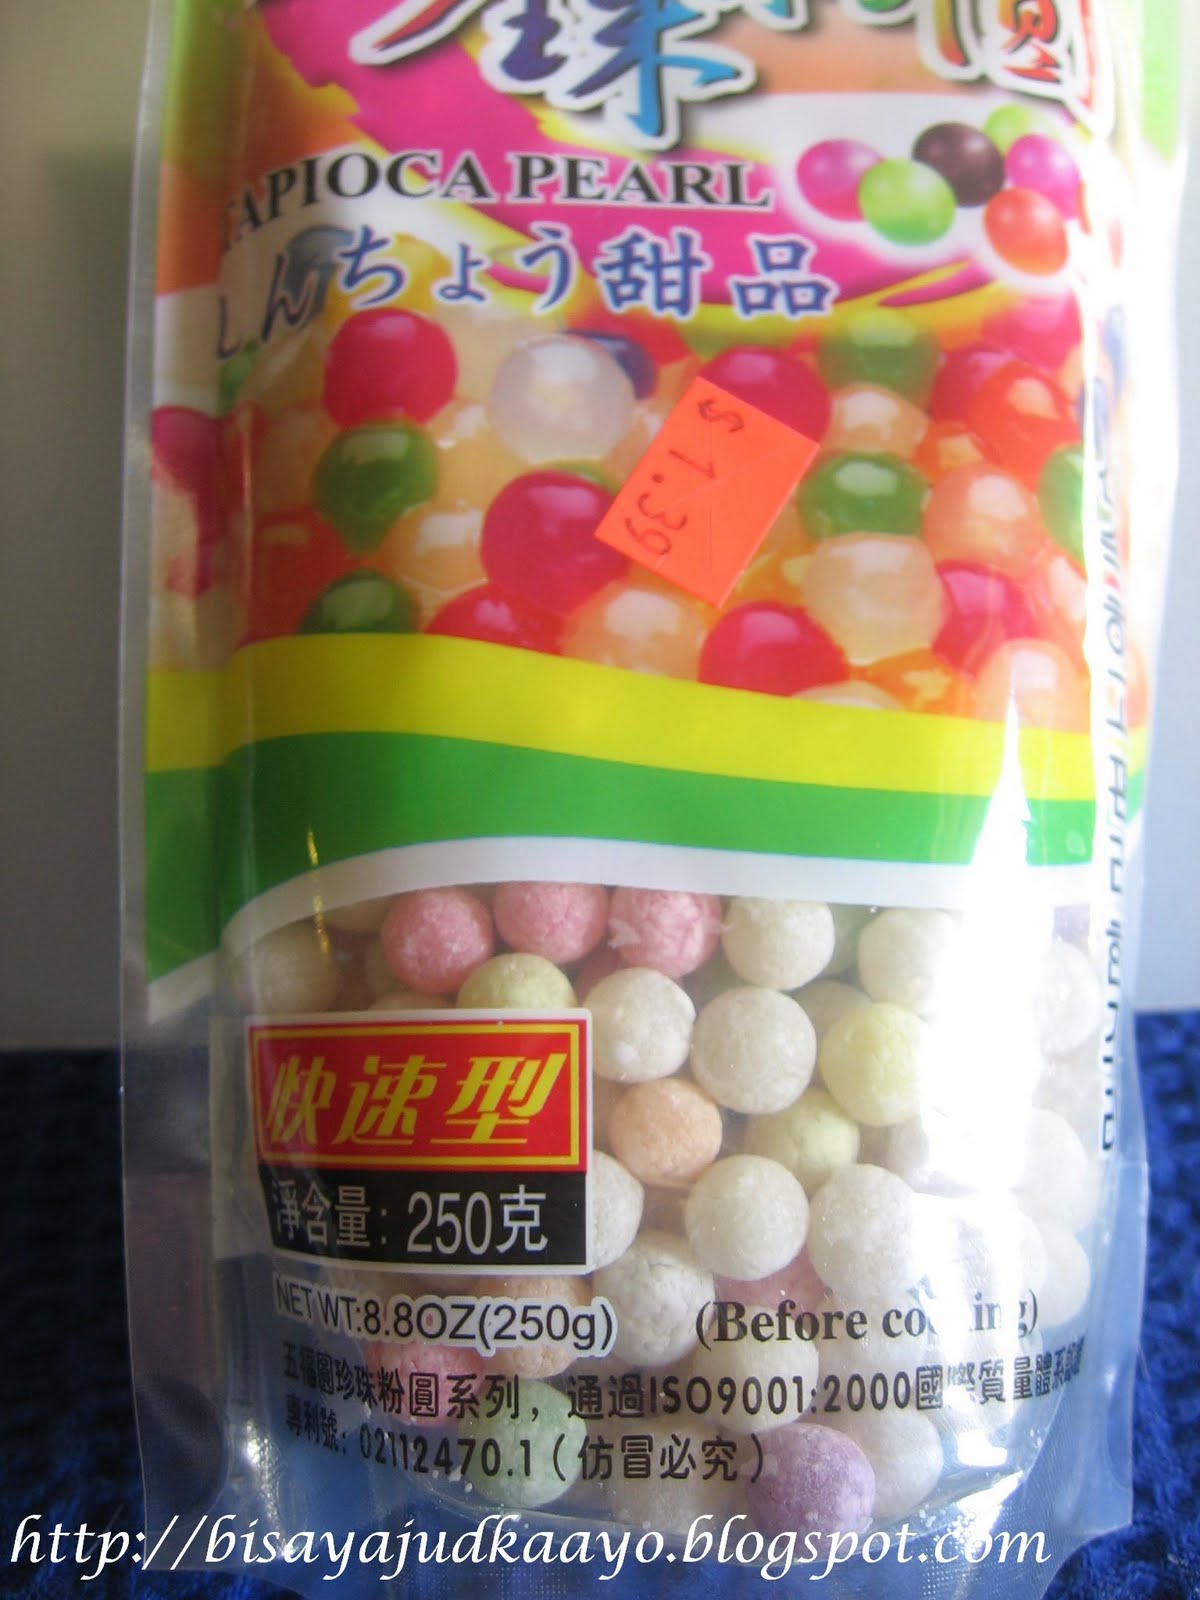
Use the colored tapioca pearls.


Colorful Tapioca Pearls


Bring the glutinous rice balls, tapioca pearls, sugar, coconut milk and water to a boil until tapioca pearls and glutinous rice balls are cooked.


Add more coconut milk, jack fruit. Taste and adjust sugar and the coconut milk.


        How to freeze the dough balls. Arrange them on a sheet pan like you would a cookie dough and put in the freezer uncovered for few minutes or until it hardens. Then transfer in a freezer bag. Freeze for future use.


Thursday, April 28, 2011

Mango Refrigerator Cake (April Kulinarya Theme)

This is my blog for this month's - April Kulinarya theme. Our host Lala of  This Little Piggy challenged us w/ DECADENCE food and the first that came to mind is mango!!! It is Asian mango season here. I know, you'll probably say whattt? they are always available. Yes, the greenish, reddish type of mango which i don't like. and no, i'm not a snub, i'm just spoiled ha!ha!.. Try the other variety of mango which is commonly called Asian mango or Atulfo, i'm sure you'll agree with me. .Asian mangoes are way better. They are sweeter and not fibrous at all. 


This is just to compare and show how big these mangoes are.


I've blogged mango dishes please click http://bisayajudkaayo.blogspot.com/search/label/Mangoes.
Mango Cheesecake
http://bisayajudkaayo.blogspot.com/2010/08/mango-cheesecake.html


Mango Ice Cream
http://bisayajudkaayo.blogspot.com/2009/08/mango-ice-cream.html


This time i made MANGO REFRIGERATOR CAKE. This dessert is easy, no baking needed and oh so good!!!


THE  QUANTITY/MEASUREMENT FOR THIS DISH ARE ESTIMATES.  I BELIEVE THAT IT WILL REALLY DEPEND ON HOW MUCH YOU'D LIKE TO MAKE AND HOW MUCH MANGOES YOU'D LIKE TO PUT IN YOUR CAKE.


Cake and Mango
Ingredients:

5 packs of broas (Lady fingers) add more if you want more layers.

6 mangoes sliced thinly (depend on the size of the mango)


Directions:
1. Slice mangoes thinly, discard the seeds. Set aside.
2. Coat the baking pan with softened butter.

3. Arrange and layer broas on bottom of the pan.
4. Pour and spread about 1/2 cup of the buttercream frosting.
5. Arrange sliced mangoes.

6. Repeat process, layer broas, then buttercream then mangoes.
7. The top most must be the buttercream layer.
8. Arrange the sliced mangoes. I made two different ways to arrange the mangoes. Please see below pictures.
9. Chill in the fridge for an hour or more and Enjoy!!!


Buttercream Frosting
Ingredients:


2 cans 18.7 oz. condensed milk
2 sticks unsalted butter, softened
2 t vanilla extract
1/2 cup confectioners' sugar (as needed)

Directions:
1. Beat softened butter, condensed milk, vanilla, and slowly add the  confectioners' sugar..

2. Continue beating until frosting  reaches desired consistency. I want mine a bit loose.


Rosette mangoes as garnish.


    Arrange sliced mangoes this way.


    A slice of the cake the following day. The color of the mango will change but the flavor is not compromised. Still delicious!!


      Tuesday, April 5, 2011

      MOLTEN CARAMEL-APPLE CAKE

      So, today April 5, 2011 is National Caramel Day and today is my day off..oh yeah what a wonderful excuse to honor the caramel day. Actually i had this recipe on "my to make list" it just became priority because of the special day! lol!
      I have made molten lava cakes before. I have made Molten Buttersctoch Cake and Molten Chocolate cake but this recipe from Betty Crocker Cookbook is something different so i had to make it. As expected it satisfied my craving. I love caramel and apple so what could go wrong? right?!!!

      Makes 6 cakes using ramekins
      Prep Time: 15 minutes
      Start to Finish: 35 minutes

      2 T cinnamon graham cracker crumbs (2 squares) I had the honey kind so i just added a dash of cinnamon to the crumbs
      3 whole eggs
      3 egg yolks
      3/4 cup packed brown sugar
      1 cup caramel topping
      1/2 cup all purpose flour + 1 T for dusting
      3/4 cup chopped peeled apple
      powdered sugar, if desired

      1. Heat oven to 450 degrees F. Spray bottoms and sides of 6 (6 oz) custard cups with baking spray (I USED ROOM TEMPERATURE BUTTER) then dusted with flour. Sprinkle 1 teasponn of cracker crumbs onto bottom and around side of each cup.

      2. In large bowl, beat whole eggs and egg yolks with whisk until well blended. Beat in brown sugar. Beat in caramel topping and flour until well blended. Stir in apple. Divide batter evenly among custard cups. Place cups on cookie sheet with sides.

      3. Bake about 15 minutes or until sides are set and centers are still soft but not liquid (tops will be slightly puffed). Watch carefully- cakes can overbake quickly. Remove from cookie sheet. Let stand 3 minutes.

      4. Run small knife or metal spatula along sides of cakes to loosen. Immediately place heatproof dessert plate upside down over top of each cup: turn plate and cup over Remove cup. Sprinkle cakes with powdered sugar. Serve warm

      NOTE: I ADJUSTED THE OVEN TEMP ON THE SECOND BATCH THAT I MADE.  I TURNED IT DOWN TO 400 F. WHEN I MADE THE FIRST BATCH AT 450 F IT WAS NOT AS GOOEY AS IT WAS SUPPOSED TO BE. SO I THINK IT'LL ALL DEPEND ON YOUR OVEN. SO PLS. BABYSIT YOUR CAKE;)


      Thursday, March 17, 2011

      BUKO PANDAN CHEESECAKE

      So i made this as a dessert for St. Patrick's Day. Nope this is not an Irish dessert not even close, the color yes! Actually i added a really tiny bit of green color just so I'd get the perfect hue.

      Buko and Pandan are ingredients for a delicious Filipino dessert. Buko is a young coconut, the meat is soft and gelatinous. The liquid is turned to coconut juice. These are available in Asian markets, fresh and in cans.

      Pandan is a tropical plant, ubiquitous to Asian countries commonly used both for dessert and savoury dishes. Pandan leaves can be purchased at Asian markets, and may be bought fresh or, more likely, frozen and are also available as an extract form which is what i used for this dessert. Pandan is fragrant and aromatic with a distinct flavor.

      I have the hankering for buko pandan for the longest time but i don't have enough gelatin to make the pandan gelatin. But i have 4 boxes of cream cheese in the fridge, i can't even remember why?..  i had the "ahhhaa" moment..why not make Buko Pandan Cream Cheese and what a perfect time to make them. Green for St. Patrick's day! ;)

      Oh and did i mention this is a no bake cream cheese? I don't have enough eggs in the fridge hence the no bake recipe. I didn't want to go out just for eggs!

      This turned out to be soooo goood! Got my fix for some buko pandan;) I highly recommend this dessert!

      INGREDIENTS FOR  CRUST:

      1 cup Graham Crackers (crushed)

      1/3 T butter melted

      INGREDIENTS FOR CREAM CHEESE FILLING:

      2 T butter
      2 T honey
      2 T buko liquid (to be used with gelatine)
      2 T pandan extract**
      2 t gelatine dissolved in 2 T buko liquid
      1 can condensed milk
      2 block of 8 oz. Cream Cheese, softened
      **add a little of green food coloring if you want a darker shade of green.
       
      Combine graham crackers and butter. Press into a base of a 20cm spring form pan. Chill.


      Heat condensed milk, honey and butter in a saucepan until combined. Boil for 10 minutes stirring continuously.

      Beat cream cheese until soft, stir in gelatine mixture and condensed milk mixture. Pour into prepared crumb base. Chill for 2-3 hours.
       
       
      INGREDIENTS FOR THE BUKO:
       
      1 can of buko (young coconut) Sliced thinly
      1 T corn syrup
      1/4 C buko liquid
      1/4 C sugar
       
      Bring all the ingredients to a boil until syrup consistency.
      Garnish on top of the chilled cream cheese.
       
       
      BUKO (YOUNG COCONUT) IN CAN
      

      PANDAN EXTRACT


      GRAHAM CRACKERS (CRUSHED)
      **I LINED THE SPRINGFORM PLATE WITH PLASTIC WRAP JUST TO AVOID LEAKAGE.***


      CREAM CHEESE MIXTURE


      LOOK HOW PRETTY!! ;)
       
       A SLICE FOR ME WITH MORE BUKO ON TOP


      THIS IS A KEEPER!