ARTS AND CRAFTS

Wednesday, December 14, 2011

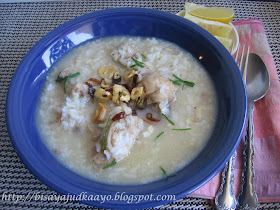
Pospas (Arroz Caldo)- November KC Challenge

Better late than never! This is my November Kulinarya Cooking Challenge. Thank you, Joy for the challenge. I really thought i have blogged pospas considering,  this is one of the staple food, comfort food at home.

Growing up and being a Cebuana, pospas is the best comfort food you could ever have and the best food espeically when you are under the weather. Even better than chicken noodle soup, i dare say. I remember how Mama would cook a big cast iron pot of pospas enough for breakfast and mirienda. I just love the aroma as she was cooking, i love the smell of the lemon grass and ginger in particular.

It was only when i went to Manila that i learned that pospas is also called Arroz Caldo and Chinese calls it congee. Actually others call it lugaw but i remember lugaw is just plain rice and chicken broth sans the chicken meat. Lugaw with beef tripes would be called Goto. Goto served with tokwa at baboy (crispy tofu, and crispy pig's jowl)  yum...oh i digress... that will be another version that i should blog.

Anyways, for those who aren't familiar with this dish, i highly suggest that you give this a try. Pospas is good anytime of the day. Like i mentioned earlier we have this for breakfast, mirienda (snacks), lunch, dinner, really anytime. Oh, even midnight snacks, and i'm serious, others, swear that this is a cure for hang over as well.

Also, pospas doesn't call for fish sauce, we use salt. Cebuanos doesn't use fish sauce (Patis) well at least back then. I know for a fact that patis for Cebuanos or Visayas region means soy sauce. It took me a while to adjust and accept that patis in Manila or Luzon region is fish sauce.

So that being said, my dish is staying true based on how my mama prepared it or shall i say a Cebuana's Pospas. This is so simple, ingredients are easy to find, a "straight forward dish" nothing complicated!


Pospas, Arroz Caldo, Congee, Lugaw ....however you call this, i really want you to give this a try if you haven't already. And you tell me which is better Chicken Noodle Soup or Pospas aka Arroz Caldo.


Ingredients:
Serves : 4

4 pcs. chciken leg quarters skin on*
1 1/2 C rice (Jasmine or Calrose) *
1 knob of ginger
2 stalks of lemongrass (remove the green top)
6 C water ( add more if necessary) *
2 T vegetable oil
1 T salt (sea salt or kosher salt)
Dash of white pepper
1 bulb of garlic (sliced thinly) I suggest to use mandoline.
4 pieces of shallots (thinly sliced) or one medium size onions
2 T chives or green onions (chopped. This is for garnish and flavoring)
1 lemon (sliced)

* Chop leg quarters to small pieces, at least 4 pieces per leg quarters. Clean and wash.
* Wash and rinse the rice until the water is clear.
* Should you prefer chicken breast i recommend to use chicken breast, skin on, bone in. Chicken bones gives more depth to the flavor profile.
* You can always add more liquid depending on how you want the consistency of your pospas. We prefer it to be runny, more liquidy

Step One: Use a Dutch oven or any Stew Pot.
Heat up the pot with 2 T vegetable oil.
Shallow fry the sliced garlic enough to make them brown but not burned. Remove and set aside.
Using the same oil shallow fry the sliced shallots until brown but not burned. Remove and set aside.

Step Two:
Using the same oil, sear and brown the chicken in batches. Set aside the brown pieces.
It is imperative to use the oil that was used to fry the garlic and shallots. The oil has been infused with garlic and onion flavor which means the chicken will be seared with the infused oil.
Continue the process until all chicken pieces are done.
Remove excess oil, leaving at least a tablespoon of the grease.

Step Three:
Return the seared chicken into the pot.
Add the ginger and lemongrass.
Sear a little bit or until you get a whiff of the ginger and lemongrass. (Did i tell, i love the aroma of these two being sauteed) I think i did!!! lol!!!
Add the washed and rinsed rice.
Stir until everything are mixed.
Add 6 C of water and salt.
Bring this to a rolling boil then lower the heat and bring to a simmer until the chicken and rice are cooked.
I'd say about 25 minutes.
Constantly and gingerly stir making sure the rice will not stick to the bottom.
Taste and adjust your salt since this is basically the only seasoning you have in this dish.
Add more water if needed.

Step Four:
Remove ginger and lemongrass.
Serve in a bowl.
Garnish with some fried garlic, fried shallots, chopped chives or green onions and squeeze some lemons.
If you can get fresh Kalamansi the better. But sad to say i can't get them here so i either use lemons or limes


Fried garlic


Fried and crispy shallots


Pospas boiling away with a knob of ginger and stalks of lemongrass


I wish you can smell this now. I also remember mama makes this during rainy days especially when we don't have school because the blackboards are  wet! ha!ha!ha! that's a joke. But yeah, she makes this when we have no school because of typhoon etc.


Tuesday, December 6, 2011

CRISPY KATAIFI WRAPPED SHRIMP

 What is Kataifi? They are shredded phyllo (filo) dough . Commonly used for sweets, like Ekmek Kataifi , a Greek Custard dessert which is one of my favorite dessert.

I bought the Athens brand of shredded phyllo dough for my ekmek and was glad to see that the box had a recipe for kataifi wrapped shrimp. I then divided the phyllo so i can make both.

This dough look like vermicelli. Since i have worked and fried vermicelli for my Crispy Noodles , I thought I could handle it. Well it was quite a challenge.  I posted a picture of how my first shrimp looked like.  It takes practice, patience and a little of your twist and quick movement of your wrist. You'll see what i mean. But over all they are worth it.

And of course me being me, i made my own version making the Athens recipe as my inspiration.

Ingredients ( Measurements are estimate)
Serves : 2 (we love shrimps)

Athens brand Kataifi (thawed)
10 pieces large size shrimps ( cleaned, deveined, tails on)
Lemon juice and zest of one lemon
2 T Sesame Oil ( 1 T for the marinade and 1 T for the cabbage)
2 T Cajun seasoning
1 t Hungarian Paprika
2 C shredded cabbage
2 cloves minced garlic
Canola oil for frying.
Bamboo skewers
Kochu Jang (Korean Hot Sauce)

Marinate shrimps with the lemon juice, zest, sesame oil, Cajun seasoning and Hungarian paprika.
Marinate inside the fridge for at least 30 minutes.

Quickly saute' cabbage w/ garlic, sesame oil and S&P. Making sure the cabbage is cooked but still have the crunch. Set it aside.

Thread the shrimps onto the skewers.
Unroll and cut strands of kataifi. (Pls. check pictures below)
Roll and wrap each skewered shrimps leaving the tails unwrapped.

Deep fry the shrimps in a 350 degrees F oil, one at a time until they turn golden brown and crispy. You have to baby sit each shrimp, they cook fast.
Remove and set on a cookie rack to drain excess oil. (This is to avoid the bottom part to turn soggy)

Served with the shredded cabbage and  Kochu Jang (Korean hot sauce).
You may use different sauce like soy sauce,  Sriracha, sweet and sour sauce or tempura sauce why not.

WHAT I SHOULD DO THE NEXT TIME I MAKE THIS.
1. Make an egg flour batter and mix the marinade ingredients. The batter will help adhere the strands of kataifi around the shrimps. I believe this will make frying easier.

2. Work on a wider chopping board or those thin plastic chopping board for easy clean up (That's what i used)


So worth making these. Not only do they look pretty they are really good. The crunch of the kataifi , the sweet taste and tenderness of the shrimp, the heat from the cajun seasoning and the sauce....... perfect combination. Great for parties and holidays.


I served them w/ shredded cabbage and Kochu Jang ( Korean Hot Sauce)


Skewered the shrimps with bamboo sticks to prevent them from curling when cooked. Marinated the shrimp with lemon juice, Hungarian Paprika, Cajun seasoning and Sesame oil. Yes, i saved the shrimp heads and wrapped them with kataifi as well. 


Athens Brand Kataifi. (Shredded Phyllo Dough)


After some research, i learned that you can make your own kataifi by thinly slicing phyllo dough sheets. That is if you can't buy them.


Prepared and lined up my kataifi.. Cut and spread few strands of kataifi.


Rolling.


Rolled . Leave the tails uncovered


This is what i meant. 
The bottom shrimp was my first, the kataifi floated leaving a few around the shrimp. 
The middle one, i figured to anchor them down, looked better but i was not satisfied. 
On my third attempt i quickly lifted and rolled it around while frying to make sure the kataifi strands will wrap around the shrimp. 
Finally, they look perfect to me, just like the picture on the box ;)


I am making these again..that's for sure!!! I'm also thinking of making a similar version by using vermicilli. 


Kataifi Wrapped Shrimp served with Shredded Cabbage and Korean Hot Sauce.
A must try dish.

Tuesday, November 29, 2011

Ekmek Kataifi (A Greek Dessert)

I have a long list of favorite desserts and this is one of them. I finally found a good recipe in English. I'm sure there are a lot of good recipes but just not in English.  Got this recipe from Kali Orexi .

Ekmek, Ekmek Kadayifi, Ekmek Kataifi (pronunciation - silent K  (ek-meh) silent i (kah-da-if) however it's called all i can say...they are "to die for"
If you like custard, phyllo and whipped cream then you are in for a treat....A MUST TRY DESSERT. ;)

 If you can't find the shredded phyllo  you can  Make your own Kadaif . 

** I'm so happy w/ the end result.
**Next time, i will bake my kataifi a little bit longer to get the brown color which i'm sure will give another layer of flavor.
**I will add more almonds but make sure to add them after slicing to get a perfect and beautiful slice of your ekmek.


Brush the Kataifi strands with the melted butter then place the pan in the oven. 


Toast the Kataifi strands until golden brown.


For the pastry base:

1lb. Kataifi pastry
1/2 cup melted unsalted butter, plus a pat more for buttering the pan

For the Syrup:
1 cup sugar
1/2 cup water
1 tsp. fresh lemon juice

For the Custard:
7 egg yolks
6 cups milk
1 1/2 cups sugar
7 tablespoons fine semolina
4 tablespoons corn starch
1 teaspoon vanilla
2 Mastiha crystals, ground with a mortar and pestle (Skipped this step)


Preheat oven to 375 degrees. Butter a large rectangular baking pan (about 11×15 inches), making sure it is relatively deep enough to accommodate the layers of pastry, custard and whipped cream. To begin making the base, take the strands of Kataifi and pull them apart slightly while layering them in the bottom of the buttered pan–no need to press down on the Kataifi strands as they are better left light and fluffy. Brush the Kataifi strands with the melted butter then place the pan in the oven. Toast the Kataifi strands until golden brown.

Meanwhile, begin making the syrup by boiling the sugar with the water in a small saucepan for about 5 minutes. Remove from the heat and stir in the lemon juice, then pour the hot syrup over the toasted pastry base.

To make the mastiha-flavored custard, add the sugar and the egg yolks in a medium saucepan and whisk until combined. Alternating as you go, slowly begin adding the semolina, milk and corn starch whisking until well incorporated. Move the saucepan to a burner and set it over medium heat. Cook the mixture stirring constantly and being careful not to scorch it. Once the custard thickens, remove the saucepan from the heat and beat in the vanilla and ground mastiha. Cool slightly, then pour the custard over the Kataifi base. Let it all cool completely before adding the fresh whipped cream topping. (At this point you can cover the dessert and refrigerate overnight if you prefer, simply adding the whipped cream the next day just before serving.)

Just before serving, combine 2 cups heavy cream and 2 or 3 tablespoons sugar in the bowl of a standmixer (using the whisk attachment) and beat the cream to stiff peaks. Spoon the whipped cream over the custard layer and carefully spread it to each corner of the pan. Carefully cut the Ekmek Kataifi into square servings. Top with a pistachio spoonsweet or, more traditionally, with toasted almond slivers or chopped pistachios.
TOP WITH ROASTED SLIVERED ALMONDS


Custard w/ semolina flour and cornstarch (YUM)


Let this cool before adding the whipped cream.

It's way better if you whip your own cream.


Let this cool for perfect slices...i'm all about presentation...presentation ;). Arrange the slivered almonds strategically in that way you'll not ruin your slices. Add more after slicing.


Top view!!!


Friday, November 18, 2011

APPLE PIE COOKIES

Another great cookie recipe from my good friend Marina. I actually wasn't surprised that these cookies would come out delicious. Marina is a cookbook author, Taste of Home Field editor and Blue Ribbon winner, of course they are ooohhh sooo good ..okay, addicting ha!ha!
Thank you, Marina for another winner recipe.


These cookies are crunchy on the outside and moist and chewy in the inside, my kind of cookie  I'm not a fan of those crisp, hard cookies. Each bite you get to taste layers of flavor. you get the nutmeg, cinnamon sugar flavor right away then you get to taste the apple, then the nuts and the hint of the lemon orange extract. These are perfect for the holidays.


Ingredients::
Yield : 4 dozens.

3 eggs
1 lb sweet butter, softened
1 lb brown sugar
1 1/2 C sugar
1 Tbsp. cinnamon
1 1/2 tsp.  fresh grated nutmeg
2 Tbsp vanilla extract
1 Tsp. fiori di sicilia extract***
6 C sifted flour
1 1/2 tsp salt
1 1/2 tsp baking soda
2 C chopped walnuts, toasted ****
2-3 Tbsp. butter
3 C finely chopped apples (5-6 small apples)
2-3 Tbsp sugar
2-3 Tsp cinnamon

1 tsp fresh grated nutmeg
2 tsp fresh lemon zest
1 Tbsp fresh lemon

Cinnamon-Sugar


Preheat oven to 350 degrees F. Prepare cookie sheets with parchment paper, set aside.In a large bowl beat eggs 4 to 5 minutes. Set aside.Cream butter until creamy.
Add brown sugar and mix until well incorporated.
Add spices and extracts. 
Mix thoroughly to combine well.

Add beaten eggs to sugar-butter mixture and mix until well incorporated.
In a separate bowl, combine flour, slat and baking soda.
Add to batter and mix well, 
In medium to large saute' pan, melt the 2-3 Tbsp of butter.
In a medium bowl, toss chopped apples with sugar, cinnamon, nutmeg and lemon zest.
Saute' apples in melted butter until soft.
Add lemon juice and stir well.
Remove apples onto a flat plate to cool down.
Add cooled apples and walnuts to batter and mix until well incorporated.
Careful not to break apart the apples.
Refrigerate batter for 10 minutes.
Drop cookie batter by using an ice cream scoop onto prepared pans.
Sprinkle tops of batter with 1 tsp cinnamon sugar.
Bake only six cookies at a time on each cookie sheet.
Bake 18 to 20 minutes.
Let cool 5 minutes before removing from pan and placing them on a cooling rack.


**I didn't have fiori di sicilia extract. According to Marina you can purchase this from The Bakers Catalog of King Arthur's Flour. But you can make your own:

FIORI DI SICILIA EXTRACT (MIX YOUR OWN) : Lemon extract, Orange extract and Vanilla extract.

** I used mixed nuts. I used almonds, walnuts, hazelnuts.


Monday, November 14, 2011

COOKING WITH TEA - NOVEMBER 2011 DARING COOKS CHALLENGE

 Sarah from Simply Cooked was our November Daring Cooks’ hostess and she challenged us to create something truly unique in both taste and technique!

What a perfect challenge. I was in Chicago last month and had a food tour that included tea at Tea Gschwendner and purchased different kinds of tea. So "went to town" and did three dishes using 3 different teas.

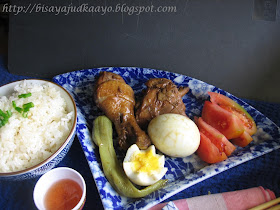
First i made, Braised Chicken which is pretty  much similar to the Filipino Chicken Adobo. The only difference is the addition of the tea... i used Bossa Nova and Rooibush Cream Caramel. And yes, that's right, Cream Caramel. The combination did blend with the dish.

I used my   CHICKEN ADOBO and PORK ADOBO recipe with the addition of 1 dried lemon, 1 Hungarian pepper and 1 Tablespoon each of Bossa Nova and Rooibush tea. I like that i get a hint of the caramel from the rooibush tea. The amount of tea was just right otherwise the caramel would be overpowering. Oh, the dried lemon was a last minute "hhmmm why not?" decision.

I have been drying some lemon for a middle eastern dish experiment. I can't wait to use my dried lemons...oh well i digress. Anyways, I will be blogging that dish soon;). The dried lemon actually didn't impart any flavor at all. I couldn't taste the lemon, perhaps i should have cut it  when it got tender?


I made my own sachet of tea by using a coffee filter tied with a butchers twine.
1 T of Bossa Nova and 1 T of Rooibush Tea


Added a dried lemon

Browned the chicken  pieces on both sides. Added all the ingredients and cooked until chicken are tender.


Filipino Chicken Adobo with Tea


Braised chicken + tea soaked hard cooked eggs = Perfect combination. Served with rice and fresh tomatoes...WINNER!!!! It's an Asian thing!!!


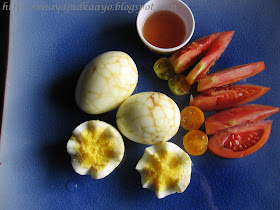
Hard Cooked Eggs served w/ Pinakurat (Filipino Coconut Vinegar) and fresh tomatoes from my garden.

Hard Cooked Eggs Recipe to follow.


I used Sara's recipe for the hard cooked egg w/c is called Chinese Egg Tea.
Servings: 6 eggs
Ingredients
6 eggs (any size)
2 tablespoons (30 ml) (6 gm) black tea leaves, or 4 tea bags
2 teaspoons (10 ml) (5 gm) Chinese five spice powder
1 tablespoon (5 ml) (3 gm) coarse grain salt
toasted sesame seeds, to garnish
Directions:
  1. In a large enough pot to avoid overcrowding, cover the eggs with cold water. Bring to a boil over medium heat and simmer for twelve minutes. 
  2. Remove the eggs with a slotted spoon and keep the cooking water.
  3. With a spoon, tap the eggs all over until they are covered with small cracks. This can also be done by tapping and rolling the eggs very gently on the counter.
  4. Return the eggs to the pan and add the tea leaves or bags, Chinese five spice powder, and salt. Cover the pan.
  5. Heat gently and simmer, covered, for one hour.
  6. Remove the pan from the heat and let the eggs cool down in the liquid for 30 minutes.
  7. Remove the eggs from the liquid. Peel one egg to check how dark it is; the others can be returned to the liquid if you wish to have the web-like pattern darker. Allow the eggs to cool fully.
  8. To serve, peel and slice the eggs in halves or quarters. Sprinkle with toasted sesame seeds.

    The Chinese tea eggs are best eaten within 24 hours and are unsuitable for freezing.


Salt, Black Tea, Chinese Five Spice Powder.


I didn't soak the eggs longer, that's why the crack marks aren't pronounced. And didn't get the taste of the tea. I will increase the amount of tea and soak the eggs longer next time i'll make this.


My third and last dish for this challenge is  TEA BRINED FRIED CHICKEN.

I used the egg tea ingredients and added  1/2 T of sugar to brine the chicken. Brined them for 24 hrs in the fridge. Pat them dry and deep fried. Served with green salad and rice topped with some kimchi.

It was crunchy and juicy as expected with the underlying flavor of the tea and the five spice. This actually reminds me of  the Chinese Crispy Chicken dish. Yum...you must give this a try!

Tea Brined Chicken served w/ green salad.


Tea Brined Chicken served with salad and steamed rice topped with homemade KIMCHI


I truly enjoyed doing this challenge. Thank you, Sara. I'm actually thinking of doing Tea Brined Turkey for Thanksgiving. And will be doing the Egg Tea for New Year, that'll be my round element which means prosperity/ more money.... again that's an Asian thing ;)

Saturday, November 5, 2011

ACORN SQUASH SOUP

I thought of using acorn squash for my squash soup instead of the most popular butternut squash.  I find acorn not as sweet as butternut squash.

This is a very easy and  pretty much a straight forward dish, showcasing the main ingredient ACORN SQUASH. This is so simple yet hearty and perfect for winter season but if you're in the mood to make this more "gourmet",  then by all means add more ingredients if you want. You may add, curry to add another layer of flavor. Add bacon or garnish with croutons for flavor and texture as well.

INGREDIENTS:
4 servings

1 medium to large size of acorn squash (heavy for it's size and no blemish, washed)
1/2 cup chopped sweet onions*
1/2 cup chopped celery*
1/2 cup chopped carrots*
2 cloves minced garlic
1 chicken bouillon cube
3 T all purpose flour
3 T butter
2 T sour cream
nutmeg
olive oil
1 C milk ( you may use half and half cream)
1 C water or more if needed.
S&P to taste

Step 1
Cut acorn into half, remove the seeds.
Drizzle w/ olive oil, salt and pepper
Roast in a pre- heated oven at 375 degrees F for 45 minutes or until squash turns brown but not burned and meat is tender.
Remove from oven and let cool.
Scoop out the acorn meat and set aside.

Step 2
In a Dutch oven pot, saute the garlic and  mirepoix in butter.
Add  flour to make a roux *
Gradually add water and chicken bouillon, stir until the bouillon has dissolved.
Add the acorn meat.
Bring to a boil for few minutes.
Add milk, sour cream,  a touch of freshly grated nutmeg, season with S&P.
Let it simmer until the soup gets to a honey consistency.
Taste and adjust seasoning and make a slurry* if you like the soup thicker in consistency.

Step 3
Puree or use an immersion blender to make a smooth soup. Or skip this step if you want a rustic looking soup.

Step 4
Add a dollop of sour cream before serving.
Garnish with cilantro or parsley.

*Mirepoix : a combination of celery, onions and carrots.
*Roux : a thickening agent. A mixture of flour and butter or fat.
*Slurry : another thickening agent. A cold liquid mixed with cornstarch until smooth and glossy. (1/2 T cornstarch to 1/2 C water)

ACORN SQUASH 
Cut into half, remove seeds and sprinkle with olive oil and S&P


Roast until brown and tender


Scoop out meat and let it cool.


I used an immersion blender to make a smoother soup


Garnish with a dollop of sour cream and cilantro. Sour cream cuts the sweetness of the squash.


One of my favorite soup. You can add bacon, croutons or roasted chopped nuts to add another layer of flavor to an already hearty soup. 

Thursday, October 20, 2011

APPLESAUCE CUPCAKE WITH BUTTERSCOTCH CREAM CHEESE FROSTING

Made these cupcakes for a co-workers' birthday. I know some of  my foodie friends will not like the idea of using a cake mix. I don't really mind making cakes out of the box, end products are actually good. Now for the frosting, i want mine from scratch,  taste a whole lot better. Hey...that's my opinion ;)

This recipe is a combination of my previous cupcake recipe with some substitutions. In lieu of oil i used applesauce, which is not a secret, applesauce can be used to substitute the liquid for your cake batter. For the frosting i used the same recipe w/ the addition of the butterscotch ganache.. Viola a successful cupcake....and. is another keeper for sure!!! love the combination!


CUPCAKE BATTER
Ingredients:
1 package yellow cake mix
16 ounces applesauce
3 eggs

Preheat oven to 350 degrees F.
Using an electric mix, beat eggs, mix in cake mix, stir in apple sauce. Mix the batter well.
Scoop the batter into the cupcake liners, filling each liners about 2/3 full.
Bake cupcakes for 25 to 30 minutes or insert a toothpick through the center of the cupcake. If toothpick comes out clean, the cupcakes are done.
Let them cool on cookie racks.

BUTTERSCOTCH GANACHE
Ingredients:
1 package (11 oz) butterscotch chips
1 pint heavy cream

In a small pan, bring heavy cream just to a boil. Mix in butterscotch chips, whisk until smooth.
Let it cool or until thickened.

BUTTERSCOTCH CREAM CHEESE FROSTING
Ingredients:
1/4 C butterscotch ganache (you can add more if needed)
1 stick butter (softened)
1 package (8 oz ) cream cheese (softened)
3 cups powdered sugar (add one more cup if needed)

Beat butter, ganache, cream cheese in a mixer until well blended.
Add sugar gradually, beating after each addition until mixed and incorporated.
**add more powdered sugar if frosting is a bit runny.
**add a teaspoon of milk if frosting is to stiff.

ASSEMBLE THE CUPCAKE:
1. Spread a little of the ganache on top of the cupcake, just enough that it'll not drip on the sides.
2. Put frosting in a star tipped decorators bag.
3. Start piping from the outer edge working inward.